How to make the Facebook account private
In public accounts, people can easily find us from our email. Everyone can see our status updates, friends, can tag us in his/her post. The private account has some restrictions like who can see our status updates, friends, email id, etc. Public, Friends and Only me are three options of privacy. In these three options, the most secured is “Only me”. The “Only me” privacy option is used for showing numbers, email, and friends list.
For status updates and Friends list, we can use the “Friends” option. We can limit our activity and profile information when it comes to our friends and the general public. It takes less time to secure our account and may be very easy to do. These are the following steps to secure Facebook account:
Desktop:
1) Login into Facebook Account
Firstly, open the Facebook official website by pasting the https://www.facebook.com/ in the address bar of our preferred web browser. If we already logged into Facebook, we will directly reach the News Feed page. But if we are not login, enter the username, phone number, and email address, followed by the password in the given tab.

2) Click on the drop-down.
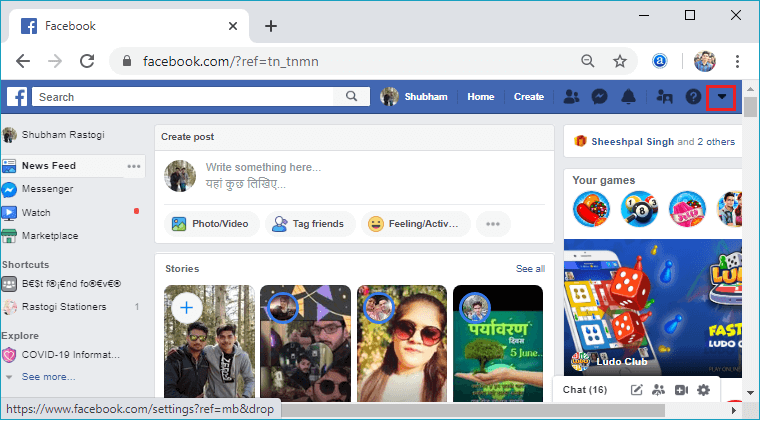
After login successfully, we will click on the drop-down menu located at the top right corner of the screen. A list of options will open in response to this click.


3) Open Setting
Now, open the setting page on Facebook. We will do this by clicking on the Setting option of the drop-down menu.

4) Click on the Privacy
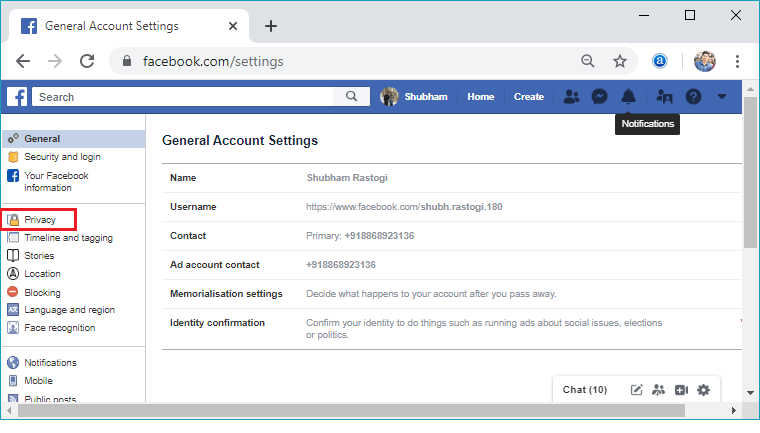
On the left-hand side of our screen, we will see a long list of menu options. From these options, we will select the “Privacy” option. The “Privacy” option will be the fourth item down from the top.


5) Change the privacy elements.
We will click on the “Edit” option located at the right of each section to change particular privacy elements. This click will expand the section, and the relevant information will be visible.


6) Timeline and Tagging
We can change the Timeline and Tagging options such as who can share the posts, who can tag you in the post, and who can post on your timeline to make our Facebook account more private. These options are found in the Timeline and Tagging section on the left -hand side of the screen.


Mobile:
1) Login into Facebook Account
Firstly, launch the Facebook app and doing this, and we will directly reach the News Feed page. But if we are not login, enter the username, phone number, and email address, followed by the password in the given tab.


2) Click on the three horizontal lines.
After login successfully, click on the three horizontal lines located at the bottom right corner of the screen. A list of options will open in response to this click.


3) Open “Privacy shortcuts” option
Now, we will open the “Privacy shortcuts” option located in the “Setting and Privacy”. We will click on the “Settings and Privacy” option, and in response to this click, several more options will be visible. From these options, we will select the “Privacy shortcuts”.


4) Click on the See more privacy setting.
A list of several more options will be visible in the “Privacy shortcuts” screen. We will see a list of options at the bottom of the Privacy header and tap the bottom option, i.e., See more privacy setting. In response to this click, more privacy options will be visible where we can change and review our current setting.


5) Tap on the relevant option
Now, we will tap on the relevant option under “Your activity” for changing Who can see our pages, past posts, activity including future posts, as well as people, and lists you follow. In the drop-down menu, we select the “Only me” option to make it completely private.


6) Repeat Step 5
Now, we will repeat the same process as we have done in step 5 for each of the options under “How people can find and contact you” to complete the privatization of our Facebook information.
Note: We can make our relationship, birthday, and other profile information private as well. These options come under the “Manage your profile” section on the “Privacy settings” screen.


